

Special Edition: All About Phyllo.
Unveiling the Art of Traditional Greek Phyllo Making: Ingredients, Techniques, and Tricks

Phyllo is one of the most temperamental and finicky ingredients in Greek cooking. Its reputation prevents so many people from attempting to make it themselves. HOWEVER, that being said, if you go don’t fall for the hype and actually UNDERSTAND phyllo, a star is born.
Phyllo becomes anything you want it to be, it behaves, it listens to you….because you are listening to the phyllo and understanding what it ‘needs’ to become the phyllo you seek to prepare. If you ‘work’ with it, it works amazingly well with you – to the point that it becomes very ‘adjustable’, very adaptable and very forgiving.
Phyllo needs to be carefully handled, gently but with confidence. It has 3 basic foundation ingredients. Flour, Water and Salt.
According to what kind of phyllo we want to make, we may add something else to those 3 basic ingredients.
For instance, we add oil or melted butter for the ‘fat’ ingredient that lubricates and ‘builds’ the phyllo structure.
We add vinegar, lemon juice, raki or tsipouro (alcohol beverage similar to grappa or eau de vie) as an acidic addition to help the salt ensure ‘crispiness’ because it assists in ‘drying out’ some moisture of the dough.
Sometimes we use carbonated water or a touch of baking soda to add a bit of ‘air’ in the phyllo dough – and we see this with little bubbles that form in the dough.
Sometimes an egg yolk in added to the phyllo dough. I am never fond of this addition. Any time I have seen it added, it only served to ‘stiffen’ it. Actually it is more protein that we are adding so it will be strengthening the gluten, not weakening these ‘fibers’. But many people swear by egg yolks in phyllo, especially when making baklava dough.
These extra ingredients are used only when it is called for – never as a ‘standard’.
But, the trick is to ‘understand’ how much you need of each ingredient.
And this could never be set in stone, just approximated.
Why?
Because the phyllo dough ingredients respond to their environment. When it is hot out, the dough responds differently than when you prepare the dough in a cold kitchen on a winter day.
Even though there is no ‘rising’ involved with phyllo dough, it is responsive to the temperature of the environment. The warmth, along with any acidic ingredients, relax the gluten and the dough becomes more pliable and elastic.
These temperamental quirks that phyllo dough express from time to time are most noticeable with the amount of water/oil that is necessary. If you see it needs more water, add it – drop by drop and letting it work in the dough. Less is more. If you overdid the water, this dough is very forgiving, and all you need is more flour to bring it together – but again…when adding flour, do so little by ever so little and let it work in before adding a bit more. Less is more, once again.
If you add more oil than needed, you cant go wrong with it. Traditional greek phyllo dough drinks it up. But if this happens you are not home free yet because you will need to adjust the quantity of oil when assembling the pita to compensate for the extra oil in the phyllo.
The reason why we don’t add too much oil when making the dough is because there will be plenty of oil when the pita is put together. Each layer of phyllo is generously oiled, there is oil in the filling, and the top of the pita is oiled before baking. Oil is necessary for the baking procedure but with moderation. It is crucial to not allow the pita to swim in oil when assembling it.
There are some more tricks and tips you need to know before you make your phyllo.
I must tell you that the only way to ‘open’ phyllo dough successfully, in the greek traditional way, is to keep on practicing and always use the narrow rolling pin.
“Open” is the English translation for the Greek word used to describe ‘rolling out’ the dough! lol
I admit it…I tend to say ‘open’ instead of ‘rolling out’ when it comes to dough – because I, like a million others, tend to switch into Greeklish without realizing it. Sorry….don’t want to confuse anyone by saying ‘open’!!!!!!!!! So now you know….if I say to open the dough – it means to roll it out.
Anyway, there are many techniques to open up the dough – the simplest being flouring the surface generously, and the dough and the pin – and applying very light pressure on the rolling pin as you flatten the dough, extending it outwards as you roll. The more you work with this dough, more you will understand its idiosyncrasies and you will easily be able to make it work for you.
Also, another point that will make your day (!) – is about phyllo size. Commercially prepared phyllo comes in pre fab sizes. Don’t aim for that size just because that is the size that is mass produced. Mass produced doesn’t mean ideal or convenient for you, it simply means ideal and convenient for the producer.
Home made phyllo becomes any size you want.
You can cut it into different shapes and sizes. You can cut small pieces to use for patching up little tears or ‘mistakes’ (there will be plenty!!! – they always happen even to the most seasoned ‘phyllofiles‘.)
The sky is the limit for what you can create with phyllo dough and ‘stuffing’.
In my grandmother’s generation they used to open up the phyllo dough in one sheet as large as the kitchen table.
For a traditional Greek country style ‘pita’, (filled with spinach, cheese, leeks, or meat or any combination you choose) use olive oil to prepare the dough as opposed to butter.
Butter makes the dough softer. Oil lends to crispiness. Oh, and speaking of oil – personally (like many others) I combine olive oil with sunflower oil and have it in my special oil bottle which I just use for phyllo.
Butter is used to make ‘sfoliata’ phyllo dough, which is similar to puff pastry.
When you begin to make phyllo, it is best to add the salt and fat to the flour and combine these ingredients well first. It will look grainy and coarse. After this step you can proceed with adding the water.
When adding the water, less is more. Add it slowly and carefully, listening to your dough, feeling how ‘thirsty’ the dough is, and adding it accordingly. A ‘recipe’ may say a cup of water, for example, but according to the type of flour, the temperature of the bowl and the room temperature, the flour may need more or less water to reach the desired texture.
Traditionally phyllo is made completely by hand. That means that as it was done in ancient times it is still being done today. It is combined, kneaded and then rolled out by hand.
Today, however, there is a ‘hack’. You can use your dough hook to do the combining and kneading. You knew that. So where is the ‘hack’? Many people go ‘machine’ all the way and they roll out their phyllo dough with a pasta machine. I haven’t tried it. Can’t vouch for it as a contemporary technique – but it’s beyond gossip – it’s true! Don’t tell them I told you.) I am still in rolling pin mode.
But either way, by hand or assisted by the ‘machinery’, you have to be very attentive to the dough, to make sure that it has the perfect texture.
what texture?
If the dough is ‘kneaded’ by the kitchen aid/kenwood/ (not a $ plug) or whatever other brand dough hook attachment prevails on the market today – make sure to stop kneading when the dough is very soft, pliable and quite sticky. You need the dough not to be too shaggy, but a bit stickier than a smooth shiny dough ball.
When kneading the dough in the bowl with the dough hook, rule of thumb is to take it out of the bowl as the dough hook has done its job in wiping the sides of the bowl clean. And the dough should be hugging and hanging onto the hook.
But, you need the dough to ‘stick to your fingers’ when you check its consistency. If it doesn’t it needs a bit more hydration. Caution: A bit.
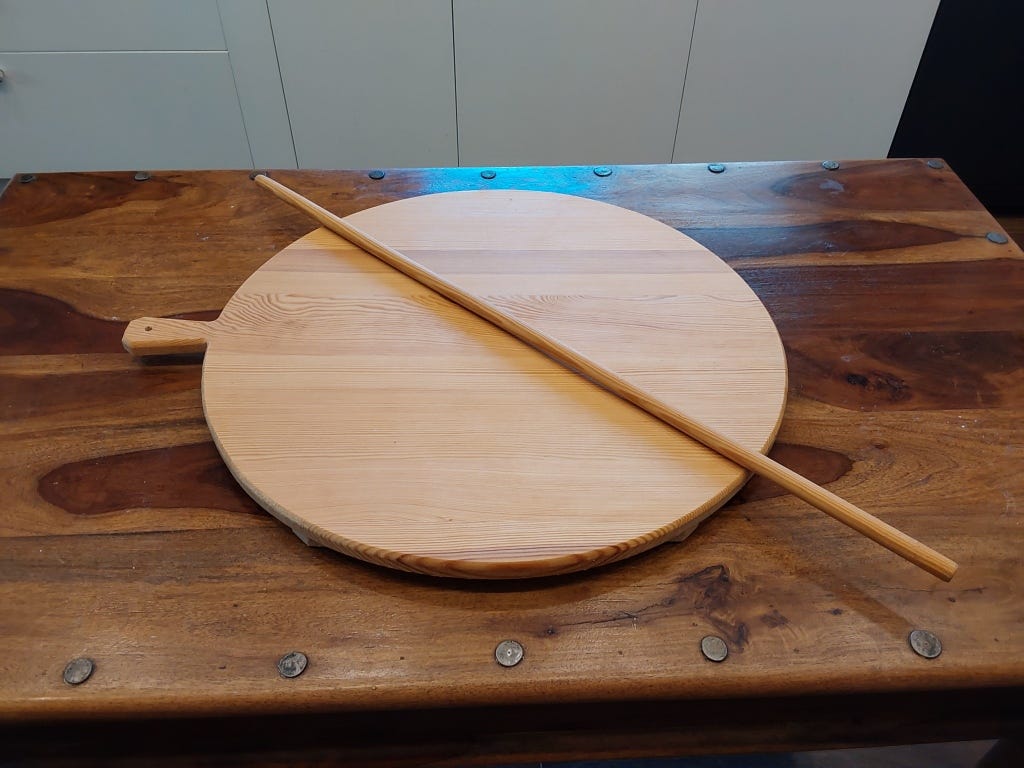
Always make sure that the work surface you will knead on is well floured, along with your rolling pin, which always needs flouring. The thin (broom stick width) rolling pin is the traditional size for rolling out phyllo dough.
Contemporary Greek Cuisine trends tend to revisit traditional cuisine and ‘adapt’ them to the times.
According to these trends, it appears that corn starch is the best choice for flouring your board and rolling pin. It conveniently dusts off the dough’s surface because it isn’t as readily absorbed as flour. And it has ‘better’ results in ensuring easier rolling out. I often use corn starch with great results.
Second choice in the trends of our contemporary greek cuisine is to use self rising flour, believe it or not, for ‘flouring’ the board and pin. I’ve tried it – it’s ok. But if I were to use a flour, I would opt for all purpose.
The traditional method is to use simple flour on your work surface and rolling pin. You will be surprised, however, when making phyllo dough with how much of that flour ends up making a thin film on everything near your work space in the kitchen! Corn Starch for some reason doesn’t make the same mess!
A marble work surface and a marble rolling pin are fine, but for traditional phyllo they are not the best choice.
They tend to be ‘cold’ surfaces and this will cause the phyllo to ‘stiffen’ easily.
The wooden work surfaces and rolling pins are ideal for phyllo because they are ‘warm’. Many people traditionally roll out their phyllo on a freshly washed ‘stiff fabric’ white tablecloth or on a vinyl tablecloth, to provide the ‘warmth’ to the dough.
If you use a table cloth, flour it generously as you would the hard work surface. Make sure that the tablecloth doesn’t bunch up or wrinkle as you work.
I can’t ever use a tablecloth for working with dough, ever. It feels awkward. I always use my plastiri or the kitchen table itself as a workspace.
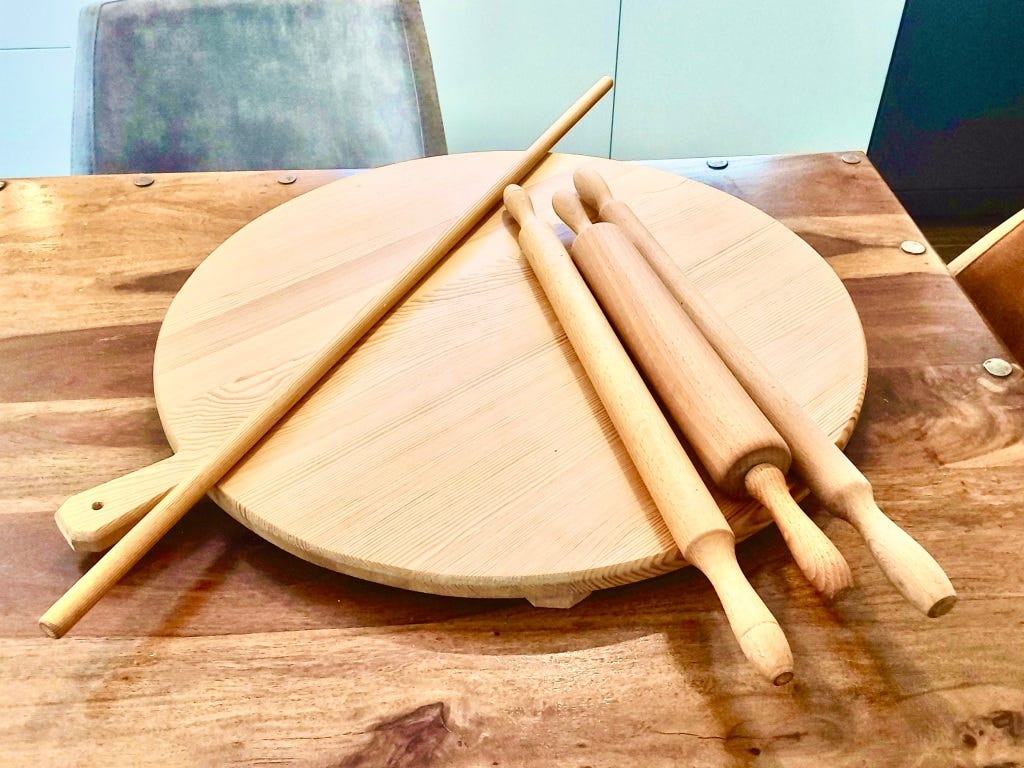
This large round wooden piece on the table is my ‘plastiri’ – traditionally used to roll out dough. The long rolling pin on the left is the one used for traditional phyllo.
An aside: I don’t want to give the impression that marble work tops and rolling pins are not, in general, good for rolling out doughs. On the contrary. They may not be ideal for traditional phyllo, but they are great for sfoliata phyllo (puff pastry), short crust pastries and american pie dough where the butter needs to be cold and the whole combination of flour and fat needs to be worked as quickly and kept as cold as possible. So for these doughs, the ‘cold’ surface of marble is ideal.
Step by Step
Making phyllo is a multi step process. There are many variations in how these steps are done. They vary from region to region. But the end result is the same and the ‘purpose’ behind each step is the same, even if done a little differently.
Here is a summary of the basic steps for traditional phyllo dough.
Combining ingredients and kneading dough.
The dough is left to rest for anything between 1/2 to 1 hour.
After resting the dough, action is taken to ensure that thin layers will be created. Techniques differ from region to region, but all are effective. It means separating the dough into pieces, rolling them out a bit, brushing them with oil and stacking them. This stack is then rolled out and then either used immediately or folded for future use.
After this step, the dough rests once again for about half an hour before being used.
If not being used immediately it can be stored in the refrigerator, carefully wrapped, for up to 3 days. Some people freeze their dough, but to be honest I have had ‘mixed’ results with freezing dough so I personally won’t recommend it.
Also, another point of information that may be important to know – In Greece, there are many kinds of phyllo, aside from traditional.
There is the baklava phyllo which is paper thin, most commonly commercially made and quite difficult to be made by hand – although it is still being made by hand as well as commercially in Greece, Turkey and Lebanon.
There is kourou dough which is something in between traditional phyllo and puff pastry.
And of course there is the puff pastry which is known as sfoliata. And this is made with repetitive opening and folding techniques that resemble those techniques used to make croissants.
And last but definitely not least is the phyllo aeros which is used to make ‘bougatsa’ pies. This phyllo is only made by hand and a bit daunting to make…it needs lots of practice. No rolling pin is used….lots of oil is used and the phyllo is ‘opened’ by gently lifting it off the table and letting it billow slightly before falling back onto the table extending in size and transparency with each stretching lift.! The premise is to create air pockets under the dough. The work surface isn’t floured in this case, it is oiled generously. It is an amazing technique. The image on the pinterest link is phyllo aeros.
That is all that I can think of regarding phyllo.
If you have any questions about phyllo in general which I didn’t cover, do not hesitate to leave a comment!
A recipe for you to try and make your own traditional phyllo is up next!
————————————————————————————————————————
Authentic Phyllo Dough Preparation: Illustrated Step by Step
800 grams flour plus flour for kneading
2 tsp salt
1 tsp sugar
2 tsp baking powder
350 ml carbonated water
additional regular water needed
3 tbsp olive oil
2 tbsp vinegar
Step by Step.
Before using the dough hook :
Put the flour, salt, sugar and baking powder into the mixing bowl
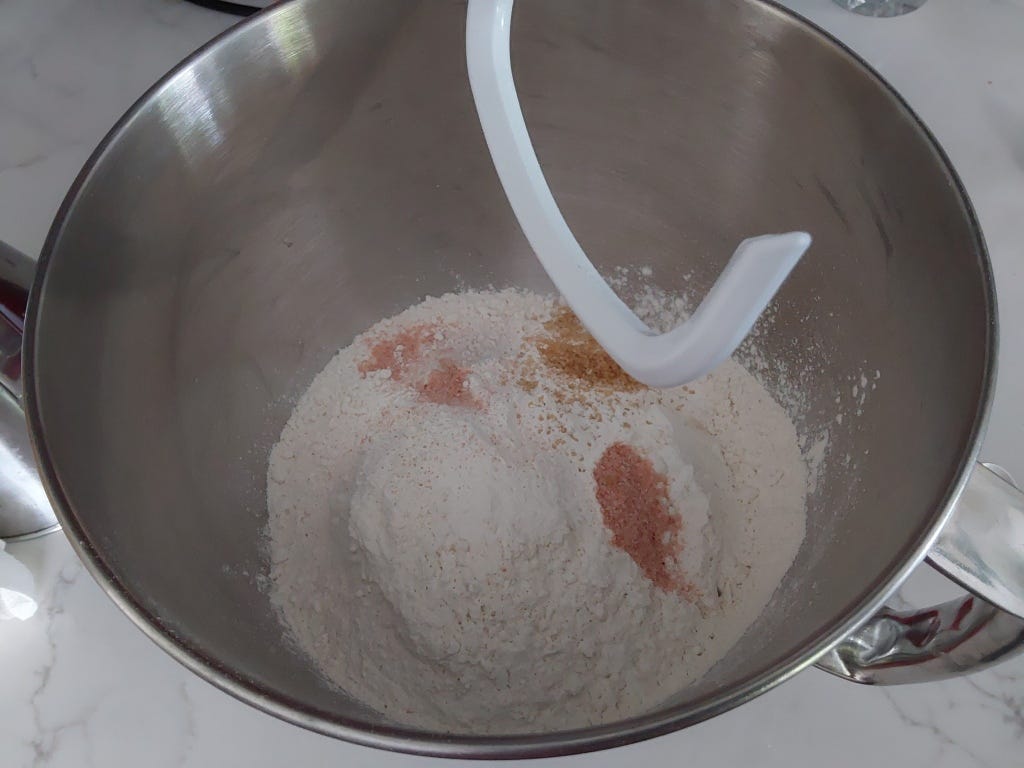
Mix well with a spoon and then proceed to add the carbonated water.
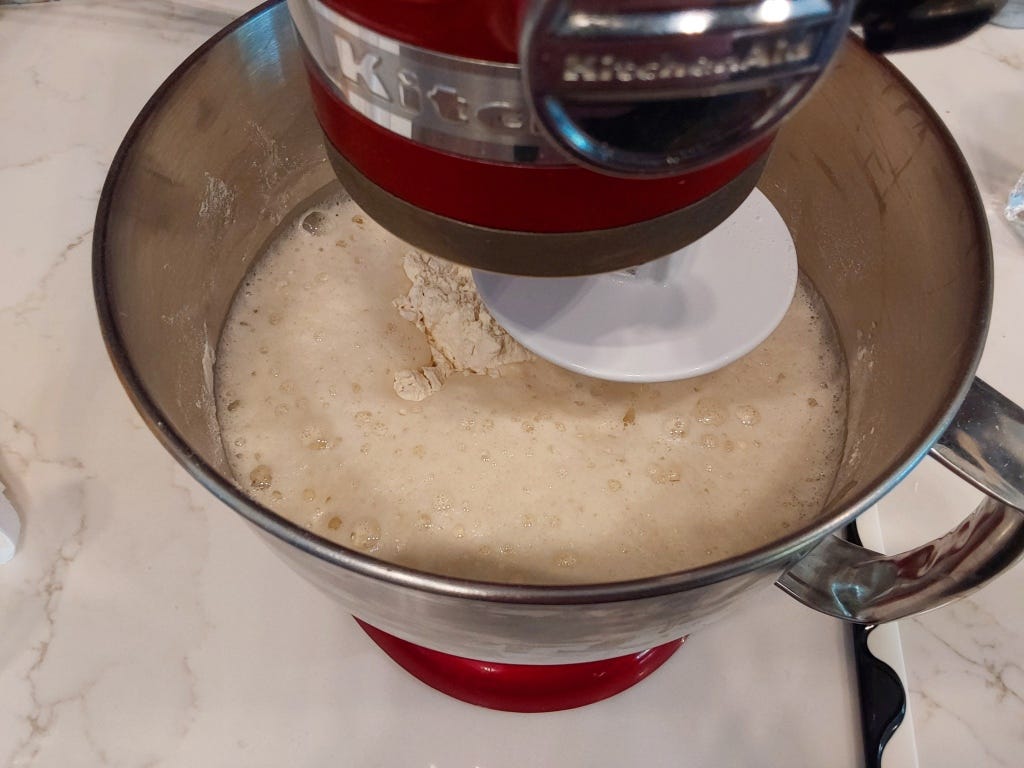
Using the dough hook on low speed, gently combine the ingredients. As it slowly combines, add the olive oil and the vinegar. Then add just enough water (not carbonated) until it starts to form a dough.
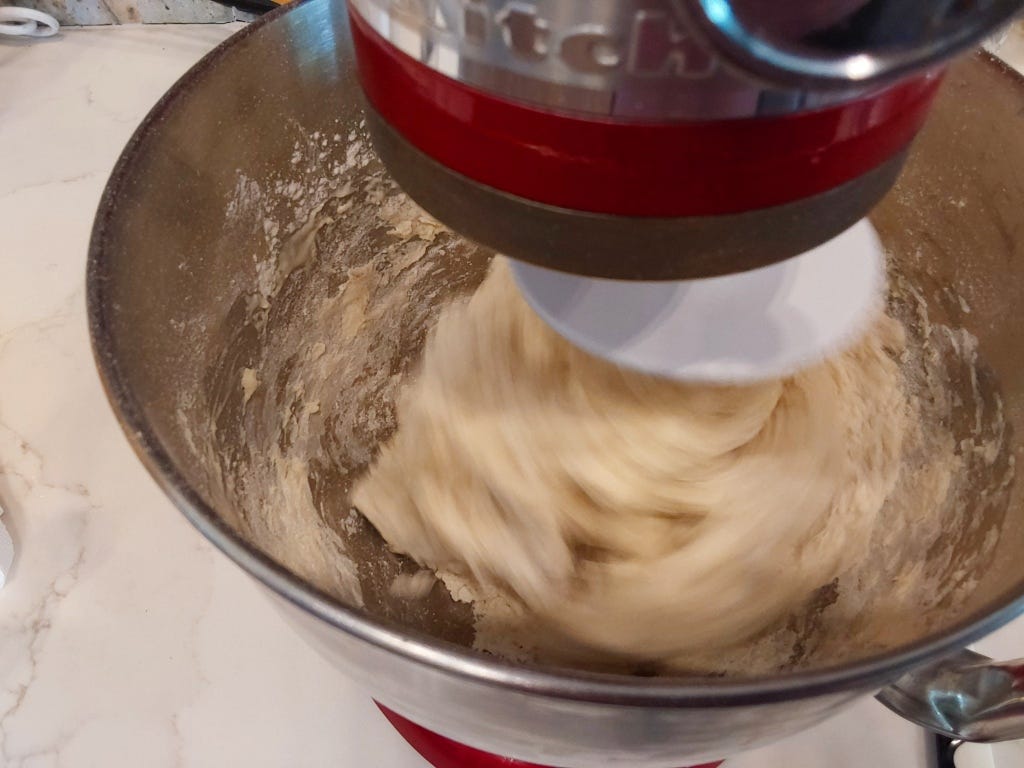
Turn up ‘the volume’ of the dough hook to medium and continue beating, ready to add a bit of water or a tad of flour if needed.
This is a progression of the dough hook kneading for approximately 5 minutes.
In the photo 3 you can see that the dough is on the hook and the sides of the bowl is wiped clean.
Time to take out the dough and place it on the well floured work surface…which for me is a traditional plastiri.
Make sure that the dough is ‘sticky’.
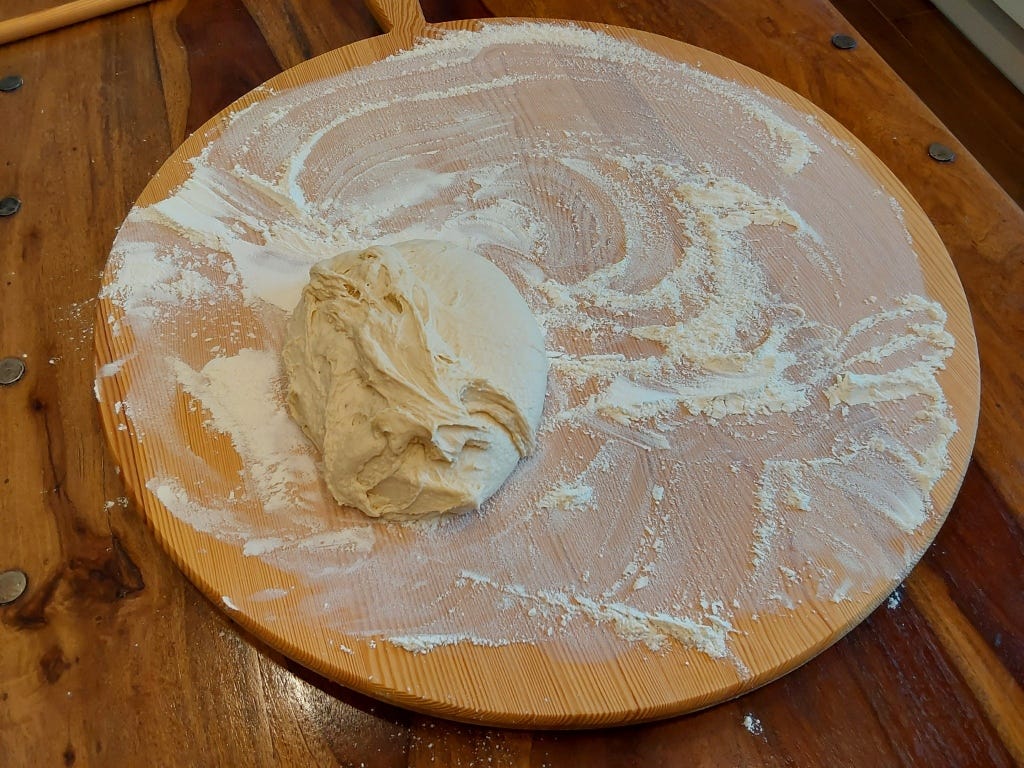
Bring the dough about and knead it gently over the flour so that it can gently become less sticky. Should take about a minute.
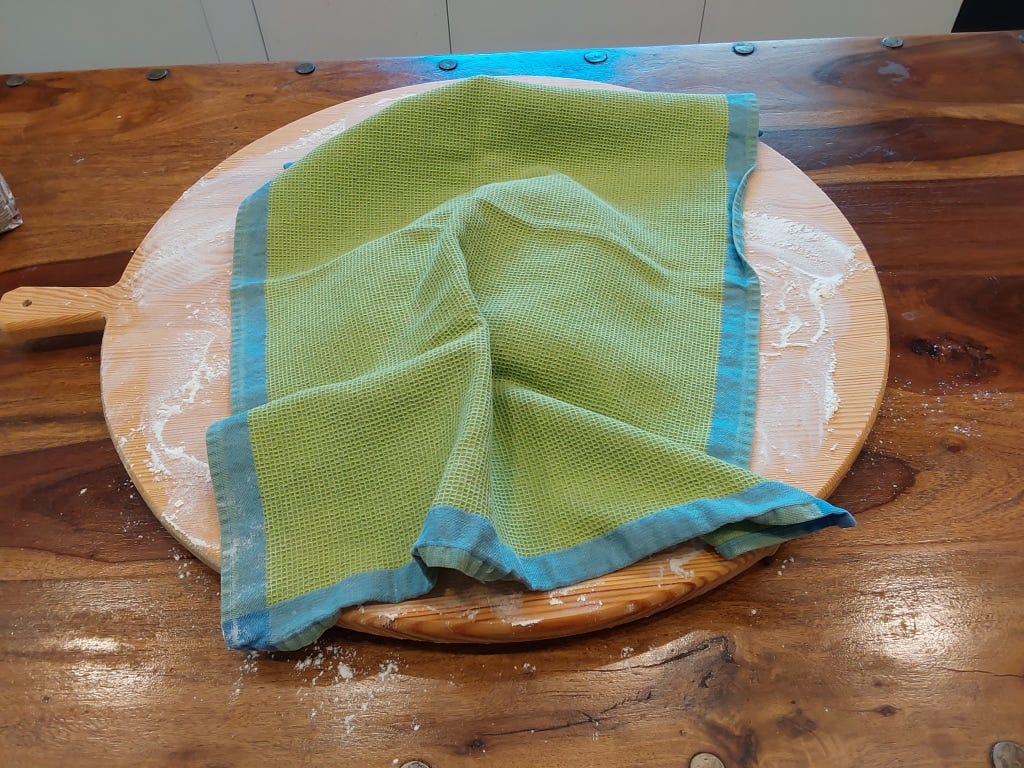
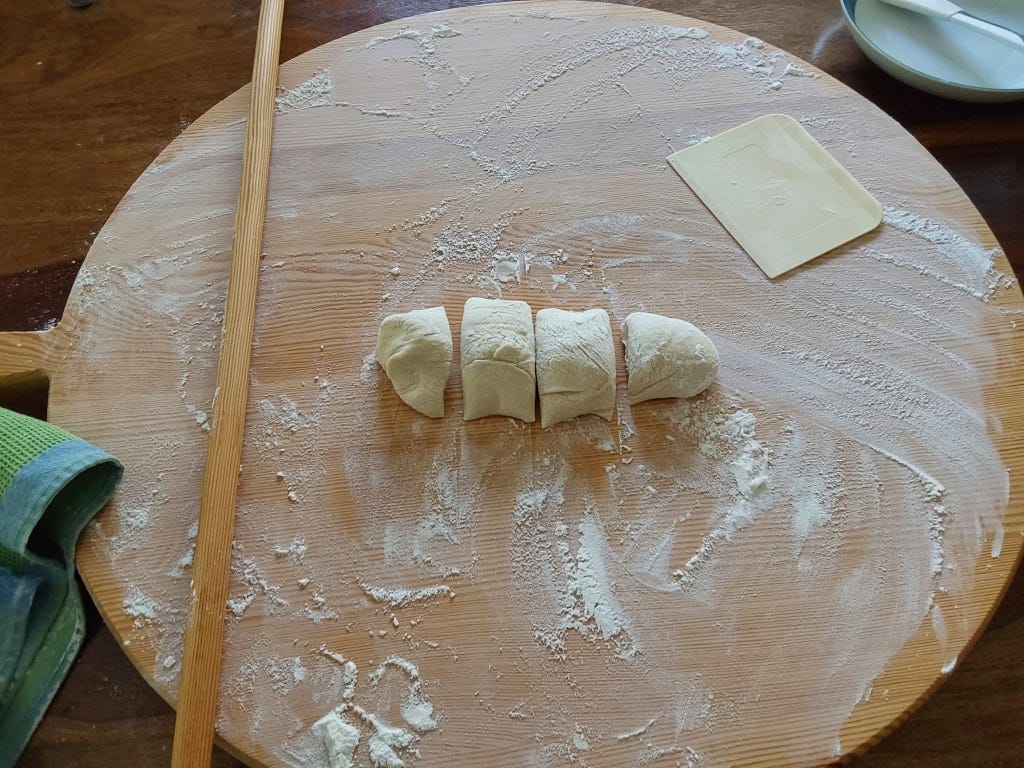
Cut the dough into four pieces. Wrap them in a clean towel and let them rest for half an hour.
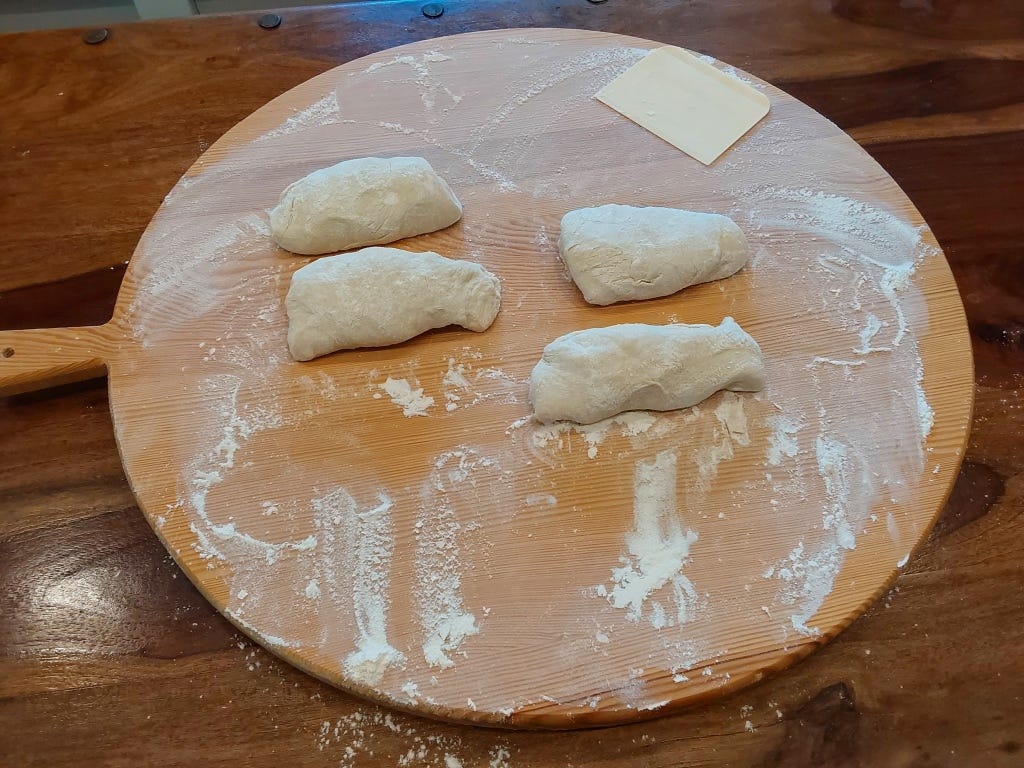
Place the towel to the side with the dough.Now take out the one cylinder from the towel wrap and keep the rest covered.
Cut this cylinder in 4 pieces.
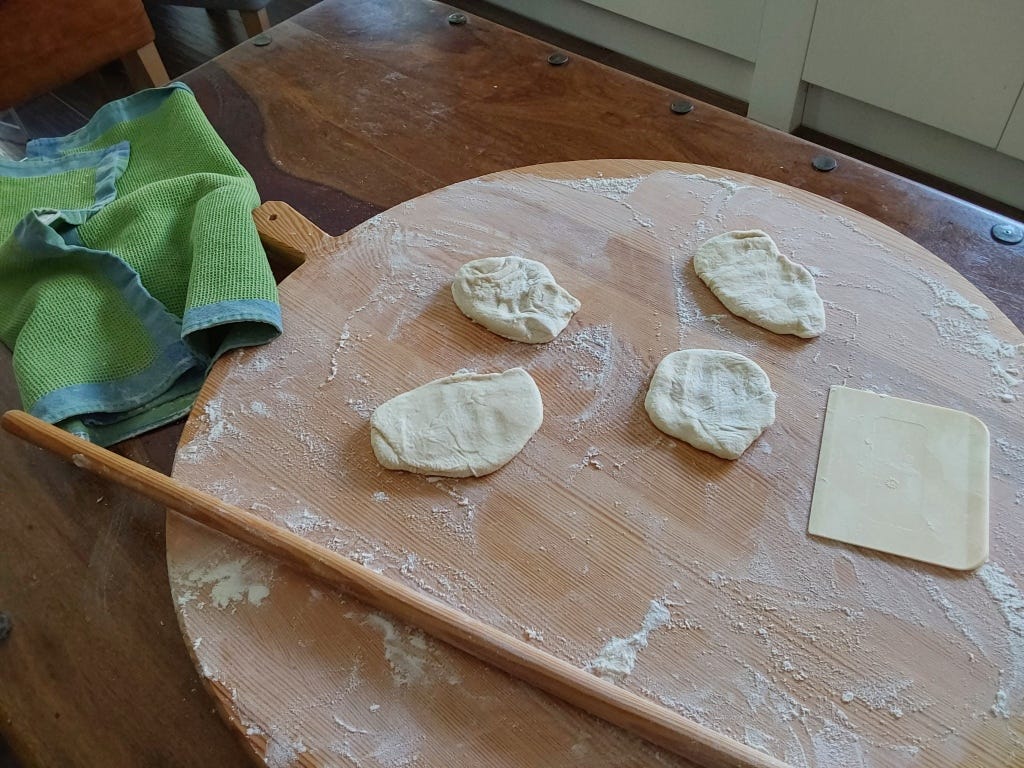
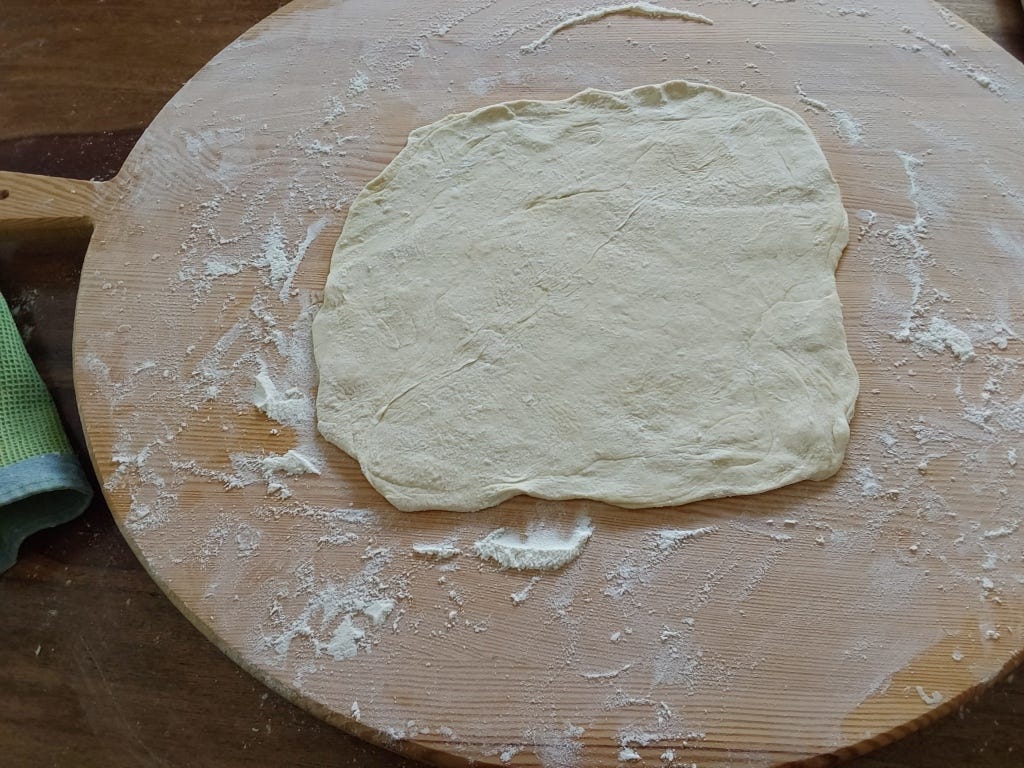
Take each piece and flatten it slightly with your hand and proceed to roll it out just a bit.
Take one of these pieces and put it aside. Brush the top of the remaining three pieces with olive oil and proceed to stack them. Top the last oiled piece with the piece (without oil) that was put aside.
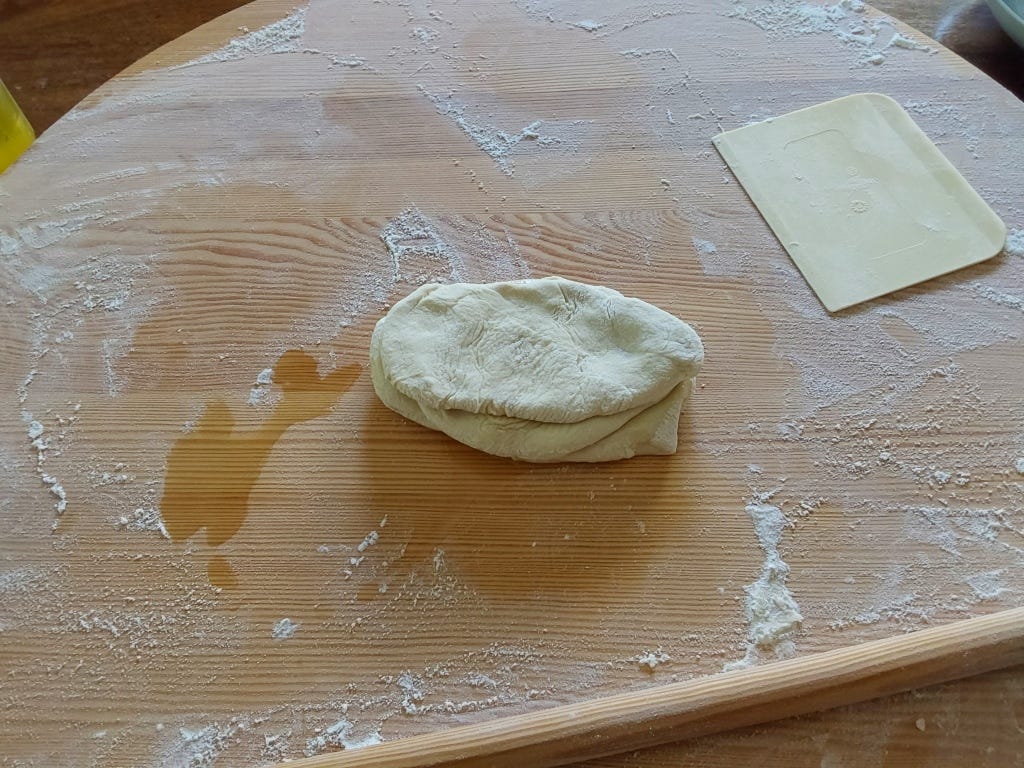
“Fix” the messy side edges of the stack with your hands, pinching the edges together and flatten this layered disc. Proceed to roll it out gently with very light rocking motion. No need to apply pressure.
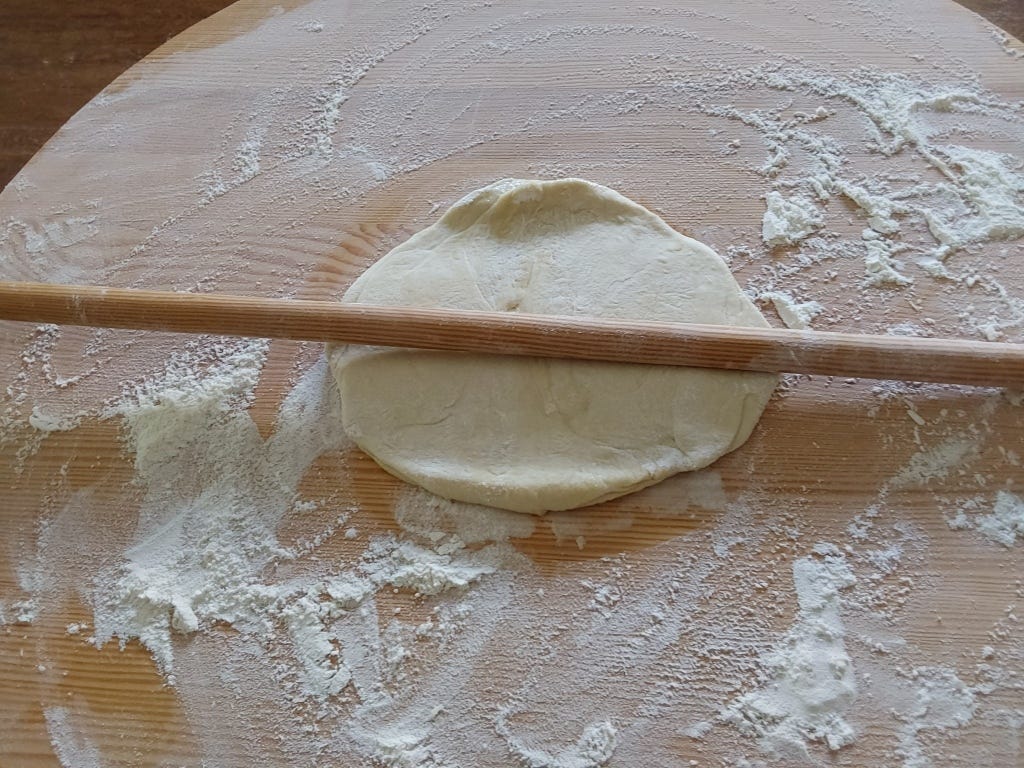
Next step is to brush this with olive oil and fold it horizontally by bring the top half over the bottom half.

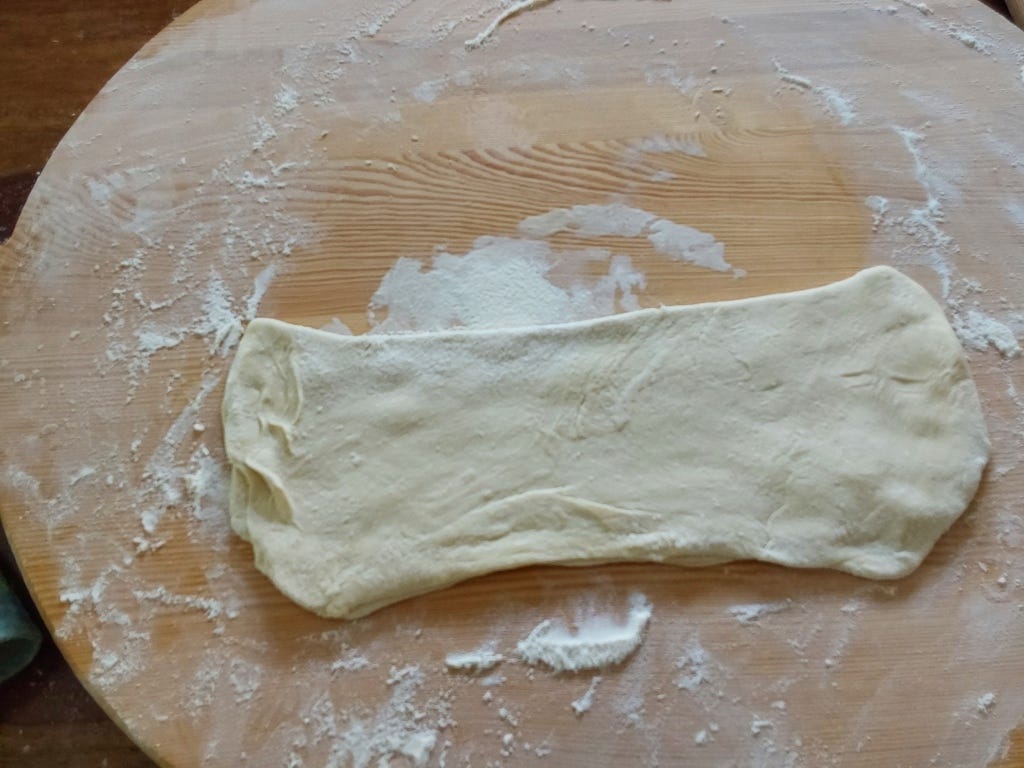
See the bubbles forming on the dough? Good sign….These are air pockets between the layers underneath. Now, brush the top of this ‘rectangular’ folded dough piece.
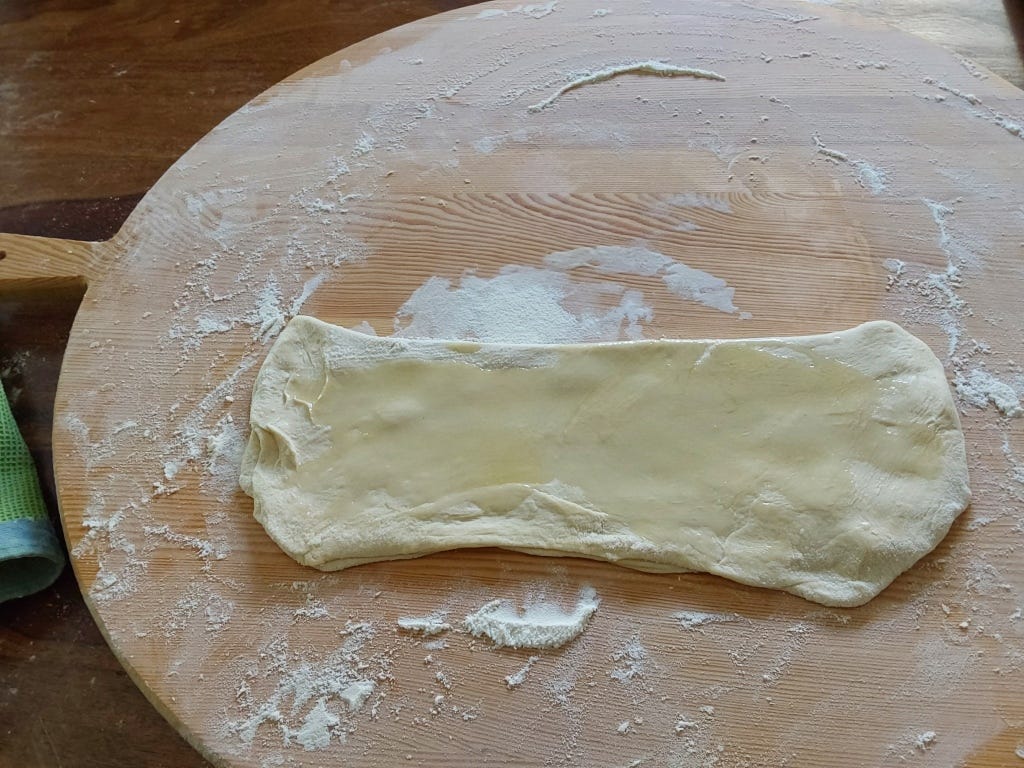
And now fold this in half by bringing the outer right hand edge of the dough to the left.
And now brush this top surface with oil and fold it in the same direction again.
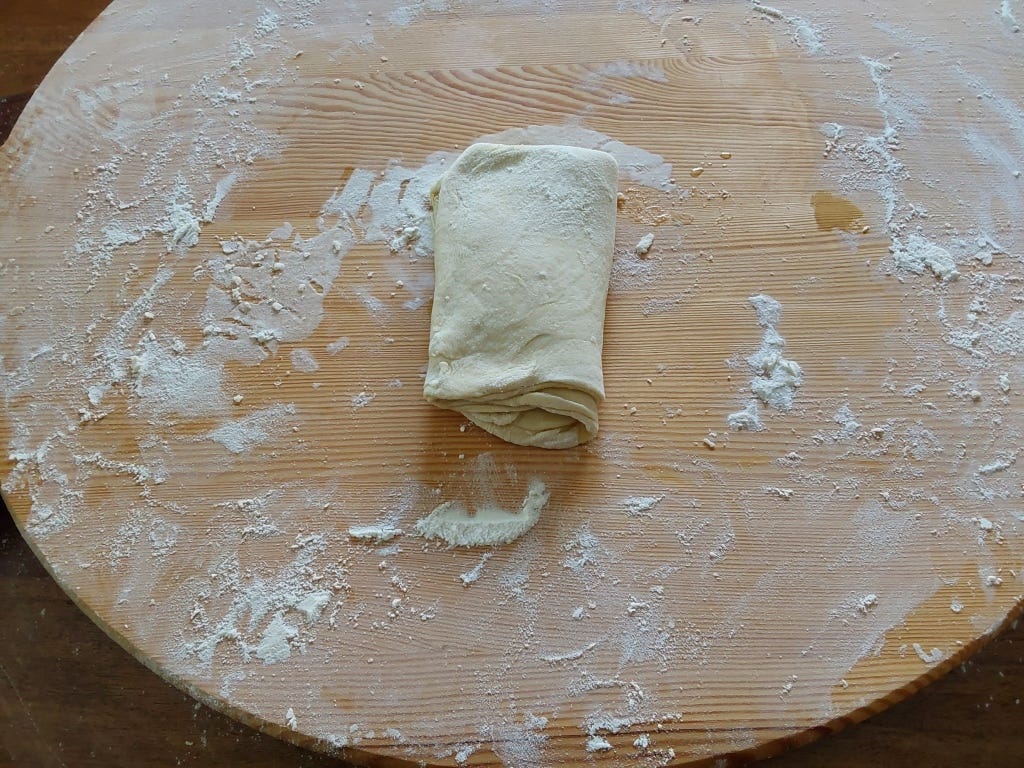
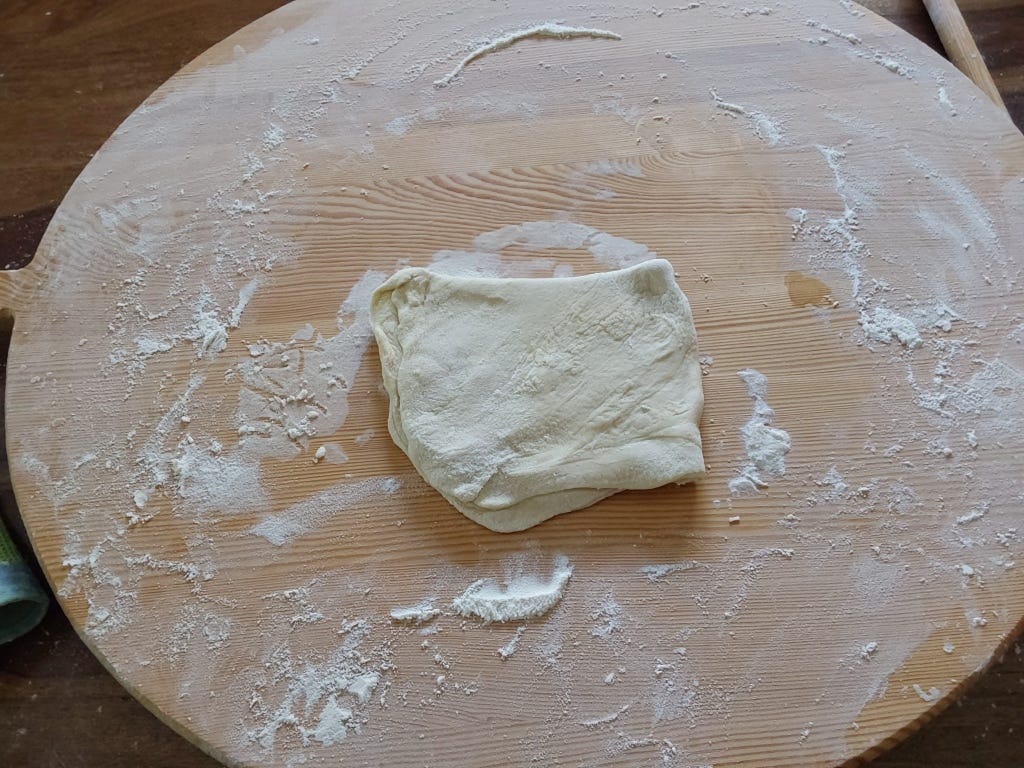
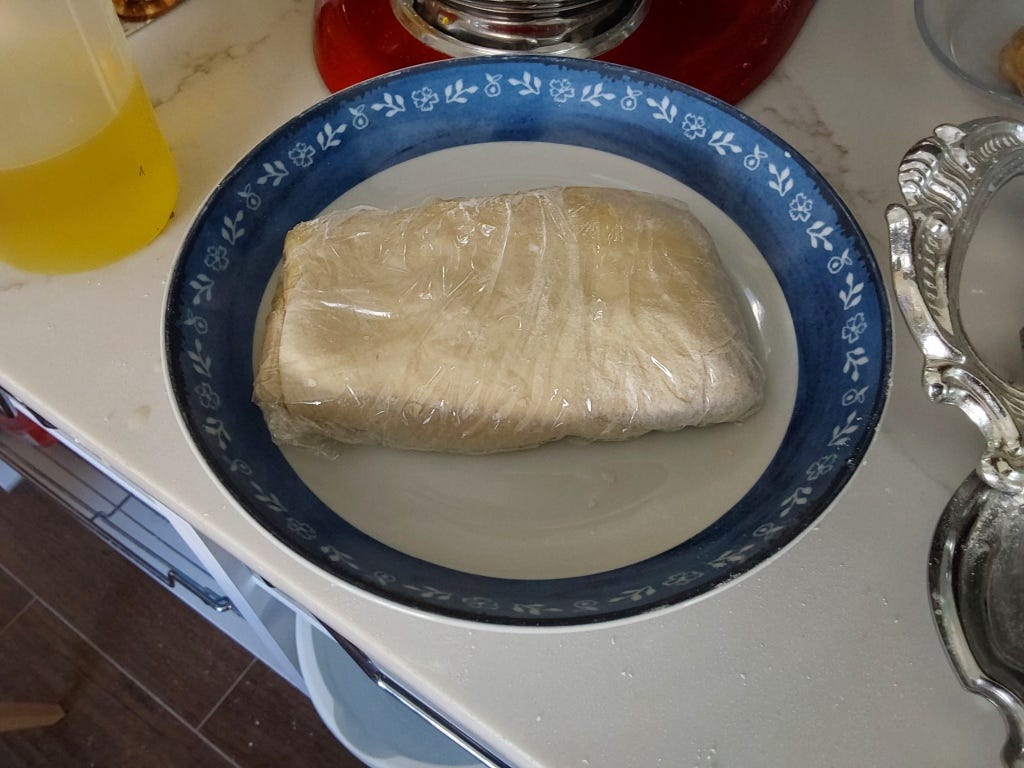
Your first piece is done! Do not brush this with any more oil. Wrap this in plastic wrap. Place it in a dish.
Proceed to do the same exact thing for the remaining three pieces of dough that are wrapped under the towel. Follow the above instructions as we did for the first piece. – Separate each resting dough piece into 4 pieces. Oil them. Stack them. Roll out the dough a bit. Fold the dough the way we did in the photos. Wrap each finished folded piece of dough and stack them in a dish.
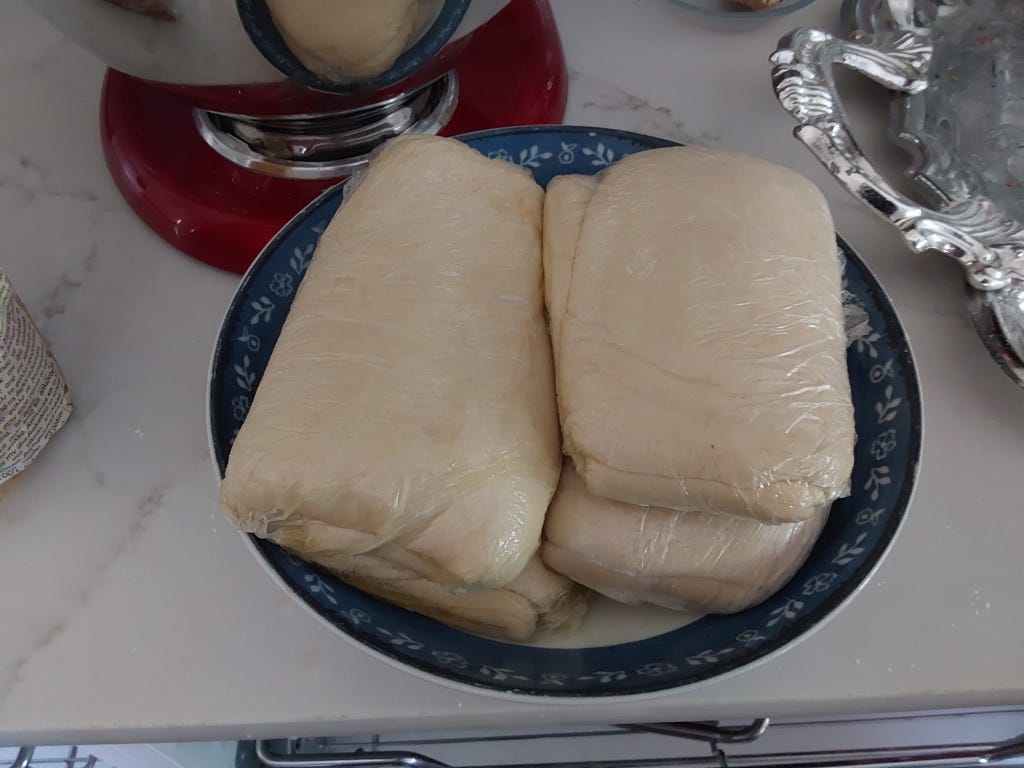
If you are not going to use the dough immediately, wrap this dish as is tightly with some more plastic wrap to serve as a cover and store it in the refrigerator for up to 3 days.
There you go! You now have plenty of phyllo to make whatever type of creation you want.
Meanwhile feel free to take one of those wrapped finished pieces and roll it out onto a floured surface. Roll it out as thin as you can. Make sure there is plenty of flour underneath, on top and on the pin.
Now you can use that to do anything! cut it in half for a small pan, use it whole for a large pan and do whatever you would have done with the commercial phyllo!
Tomorrow, I will take some of this phyllo and make Prasopita. (With leeks, scallions, onions, dill, finely chopped romaine lettuce and feta.) Its very light for summertime snacking. I usually make them into ’rounds’. I will show you how…!
Don’t forget to read the previous post on phyllo – it’s a long read, but it has everything you need to know!
Have fun with the phyllo!
Thank you so much for stopping by and taking the time to read it!. Im glad you enjoyed it!
Fascinating read – thank you for putting so much time and effort into sharing this!